Build an Airdrop Dapp with React, Wagmi and Subsquid

This tutorial unveils a step-by-step approach to seamlessly integrate React with the powerful capabilities of Wagmi React Hooks and Subsquid indexing SDK. By delving into this tutorial, you’ll learn how to interact with smart contacts using Wagmi hooks, setup your own indexer with Subsquid and build a simple and efficient airdrop dapp.
This article assumes the reader has a basic working knowledge with command-line terminals, Node JS, GitHub, git CLI tools and Smart Contracts.
A Look at the Tools
This article will specifically use the following technologies all together:
- Subsquid SDK
- Wagmi Hooks
- MetaMask
- React
- Next JS
- Typescript
You will find all of the above technologies currently used in the biggest DeFi protocols. Don’t worry if you aren’t familiar with all these things. They will be covered in more detail below.
There is lots to cover, so let’s dive in!
What we will build
The end goal will be to build a Dapp with a UI that looks like this:
The Dapp is a simple airdrop manager and uses a smart contract that allows you to distribute tokens to the addresses that satisfy a certain criteria.
The Dapp in the screenshot above demonstrates the following functionality:
- How to connect a Dapp to the blockchain via Metamask
- How to interact with deployed smart contracts
- How to read and write data on the blockchain via Wagmi.
- How to get historical blockchain data using Squid SDK
- How to make GraphQL queries
First, we will deploy an ERC20 token contract and an Airdrop contract. Then, we will set up a squid to fetch historical data from the blockchain. Finally, we will set up front-end to interact with the smart contracts and to query the historical data to determine the qualifying addresses.
The tools you will use
Wagmi is a collection of React Hooks containing everything you need to start working with Ethereum. Wagmi makes it easy to “Connect Wallet,” display ENS and balance information, sign messages, interact with contracts, and much more — all with caching, request deduplication, and persistence.
MetaMask is an Ethereum-based cryptocurrency wallet browser extension compatible with the most common web browsers. It allows users to interact with a variety of Ethereum networks.
Subsquid is a full-stack blockchain indexing SDK and specialized data lakes (Archives) optimized for extraction of large volumes of historical on-chain data. The SDK offers a highly customizable Extract-Transform-Load-Query stack and indexing speeds of up to and beyond 50,000 blocks per second when indexing events and transactions.
Metamask Setup
Visit MetaMask’s website to install the extension. Click on the ‘Download’ button and follow the directions to install MetaMask as an extension for your browser.
Once the extension has been installed you will be greeted with a Getting Started screen in your browser to set up the extension. Click on the ‘Get Started’ button and follow the instructions from there for the initial setup of MetaMask. Refer to MetaMask’s website for further details.
We will be using Sepolia test net, so after configuring your wallet, select Sepolia from the test networks.
Next, go to “Add Network”.
Search for “Sepolia” and press “Add a network”
Smart Contracts
First, let’s deploy the Airdrop contract we are going to interact with. In this tutorial, we are going to use a simple ERC20 airdrop contract. You can head over to https://thirdweb.com/thirdweb.eth/AirdropERC20 and deploy the contract or build your own as long as airdrop function accepts the same input and the token has 18 numbers after decimal.
Next, let’s deploy the ERC20 token, we are going to airdrop. https://thirdweb.com/thirdweb.eth/TokenERC20
When you are done, you should see both contracts on your dashboard.
Next, go to the ERC20 contract and mint some tokens to your address.
Now we have both smart contracts ready.
Getting Historical Data
In this project, we want to airdrop our token only to the wallets that satisfy a certain criteria. Let’s say that we only want to qualify users, who have sent a non-zero value transaction at a certain time to the Uniswap V3 router on Ethereum Mainnet.
That means that we want to index the UniswapV3 router smart contract and make a list of all senders.
We can get that data using an RPC, however, this is an expensive and slow approach. So instead, we are going to use an indexer. Indexers create and maintain searchable databases or indices that store information about various elements within the blockchain, making it easier and faster to query and retrieve specific data.
In this project, we are going to use Subsquid. Subsquid is a full-stack blockchain indexing SDK and specialized data lakes (Archives) optimized for extraction of large volumes of historical on-chain data. The SDK offers a highly customizable Extract-Transform-Load-Query stack and indexing speeds of up to and beyond 50,000 blocks per second when indexing events and transactions, so it is a perfect tool for our needs.
With that in mind, let’s set up the squid.
Start by cloning this EVM template with git clone.
This is a simple squid template that indexes all the transactions to and from vitalik.eth.
Let’s customize it according to our needs.
First, in the schema.graphql, let’s create a simple address entity. It will only have an ID.
In the terminal, run sqd codegen command to generate the entity.
Now let’s configure the data source. In the processor.ts file, set data source to eth-mainnet. For this project, we do not need the RPC, so you can delete the chain attribute.
Next, let’s set the block range. We want to only airdrop the token to those who sent a non zero transaction between these 2 blocks numbers.
In the addTransaction field specify that we only want transactions to the UniswapV3 router address.
Set the fields of transaction, that we want to see. In this case we want from and value attributes. From is going to be the address of the airdrop receiver and transaction value is going to be used to filter non-zero transactions. But we can also see other atributes such as hash and input, like so:
In the main.ts file, we import the Address entity and the processor. We start the processor and filter transactions by their values. If the transaction has non-zero value, we upsert it into the database. Since we use address as ID, it has to be unique, so instead of insert, we use upsert, that updates the entry if it already exists.
Run sqd build to build the projectMake sure you have docker running and run sqd up in the terminal. To generate the migration with sqd migration:generate.
Finally run sqd process to start indexing. You can also open another terminal and run sqd serve to checkout the GraphQL endpoint at http://localhost:4350/graphql.
After verifying that the squid works correctly, let’s deploy it into the Aquarium.
Register at subsquid.io and press Deploy a Squid.
Follow the installation instructions.
In step 2 input the name of your squid, instead of cloning the template and do not run sqd init as we already did that step before.
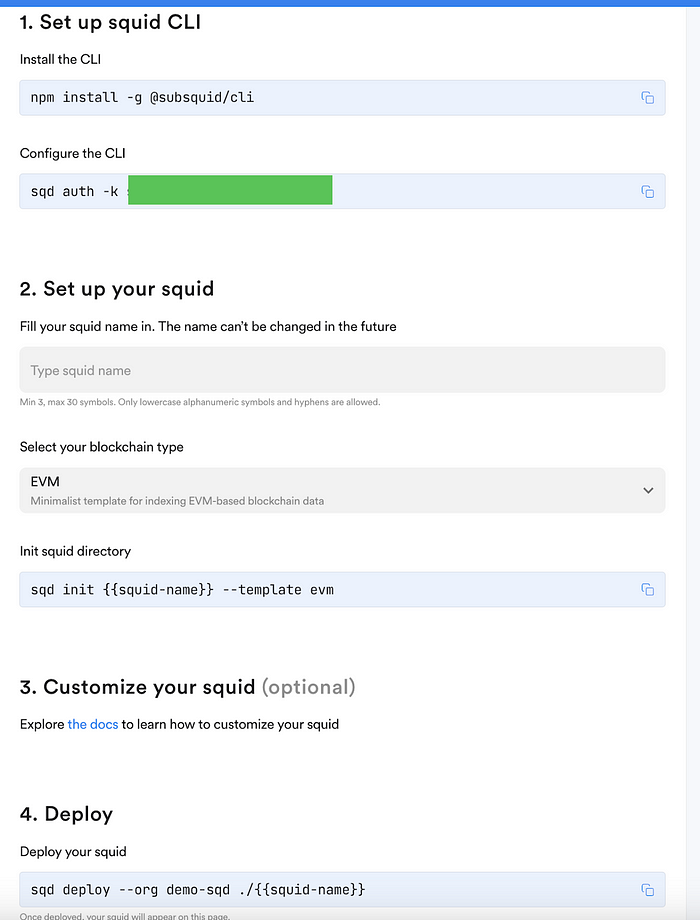
Now you should see your deployed squid on the dashboard. We will later use the API endpoint provided for us to fetch the data from the squid.
Setting up Front-End
To kick things off, install the tools you’ll need and grab the example code. You’ll need to have node and npm(Node JS) installed on your system.
For instructions on how to install node and npm follow the instructions here: https://nodejs.org/en/download/. For the purposes of this article, install v16.13.1 of node.
Also install git using these instructions.
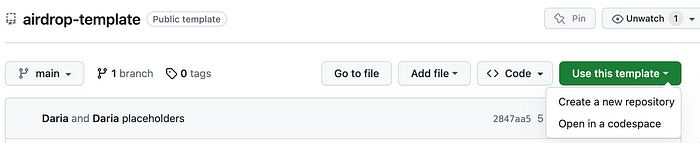
Clone this repository with git clone or start from the template.
Let’s take a look at what we are building. Our website is going to be very simple. After setting Airdrop and Token addresses, we should be able to set the allowance, get the airdrop receivers and send the token.
Final Dapp
In the template we have the starter interface.
Starter Interface
Now we implement the rest of the functionality. Let’s start with the input fields.
Open to ERC20.tsx file and create to useState hooks for token and contract addresses. And let’s also grab our own address with useAccount() hook imported from wagmi.
Initially we set both airdrop and token addresses to 0. Now let’s make sure we can read values from the input fields. Here we have an input field but it doesn’t save any values.
To change that, let’s add onChange attribute the following way:
Notice that we have also added a value attribute to show an airdrop address right away. You can repeat the same steps in the token input field, substituting the name.
Now that we can read the addresses from the input field, let’s interact with the contracts!
Under the input we have the empty stat field showing name, balance and total supply of the token. Let’s implement the functionality to show the actual name, balance and total supply.
Let’s start with the Name function.
It takes a token address and it should return the name of the token. To retrieve the name, we use useErc20Name hook from wagmi and to get the symbol, we use the corresponding hook for the symbol. And we return name and symbol wrapped in <div> tag.
Now let’s use this component in our layout. In the name stat field use the Name component and pass it the token address.
The other 2 functions are similar, so I suggest you try to set them up yourself before going forward.
Next let’s set up the balance field.
Let’s go to BalanceOf component. It takes an address of the holder and token address.
First, We get balance with useErc20BalanceOf hook. Since our token has 18 digits after decimal point, we need to normalize the number. Next, we cast it to string and return wrapped in div.
Now let’s head back to the statistics <div> tag and place the balance component there, passing your address and token address.
Finally, let’s show total supply.
Total supply only takes a token address.
So we do the same thing as before. We call the view function using a wagmi hook and then normalize the data.
And finally, we place the component.
Now when you run the dapp with npm run dev, you should see something like this, depending on the total supply you set and the amount of token you minted.
Next, let’s implement the functionality of setting allowance for the airdrop. For the sake of simplicity, it will be evenly distributed between all the participants. Let’s finish the allowance component.
It takes the address of the holder, address of the spender and token address.First, let’s set the amount and spender with useState.
Next, we prepare to approve the new spender using usePrepareErc20Approve. It takes a token address, and arguments for the approve function. Using this configuration, we can use useErc20Approve to interact with the contract.
We also add a loading component to indicate success.
Finally, we fetch contract allowance and normalize the data to display later.
Now let’s finish the input field in the component, so we can set the allowance we input.
As before, we use setAmount hook on click and set value attribute to amount.
And in the button below, we call useErc20Approve on click.
Finally, let’s show the loader component as the transaction is being processed and allowance on success.
Finally, we put Allowance component under the placeholder and pass it the required input.
We are almost finished. We only have to implement the functionality for the Airdrop component.
First, we implement the GetAddresses button that fetches the user addresses that qualify for the airdrop from the squid we previously set up. Squid SDK provides an out-of-the-box GraphQL endpoint, so we only need to query it. To do this, we will use Apollo.
The template already has the ApolloProvider imported. So we need to set up the client configuration the following way.
You can see the endpoint in your Squid info under the API.
Next, let’s set the query. Since we set up the squid to use addresses as ids, we can fetch the ids the following way from the addresses table.
We need to wrap out returned component with ApolloProvider tags using client as input.
Now, in the Airdrop component we create a useState hook for recipients.
We implement getUsers() function inside the Airdrop components. We call client.query with our query as argument. Then we get addresses from the response. For the purposes of this demo, we will sent the token to the first 10 addresses in the response, but it can be any number.
As we remember, the airdrop function takes a list of objects where recipient is an address and amount is a string. We create this list and set recipients with useState.
Similar to previous components, we use usePrepareContractWrite to set up the config and useContractWrite to call the airdrop function.
UPD: ‘airdrop’ functionName has changed to ‘airdropERC20’. Use updated name in usePrepareContractWrite.
And lastly, we call airdropERC20 function on click of the Airdrop button. Notice the disabled attribute, that makes sure we cant press the button unless we fetch users first.
And we put the component under the placeholder.
The resulting application looks like this and airdrops the token to the qualifying candidates.
You can further improve this tutorial and make the airdrop allowance depend on the value of the transactions sent by the recipient or add a Claim button.
To sum up, this tutorial equipped you to create a React-based Web3 airdrop system successfully. By integrating React and Wagmi and SquidSDk, you learned to deploy a smart contract, enable user interaction,set up an indexer, query archive blockchain data, and build a smooth airdrop process. This approach can engage users and distribute tokens effectively. Now, armed with these skills, you’re ready to explore further advancements in blockchain and contribute to its dynamic landscape. Congratulations on mastering this airdrop tutorial and best of luck in your web3 endeavors!